Showing posts with label Tutorial. Show all posts

Thursday, January 23, 2020

Tutorial for St. Patrick's Day Garland / Banner-Super Simple!


St. Patrick's Day is right around the corner, and time to think about decorations.
  This St. Patrick's Day banner is sooooo simple to put together.  The hardest thing
 might be choosing the colors to make it out of! As it says above, banners aren't 
meant just to hang on the wall.  Use it in other ways, perhaps draping around 
some of your other decor.  Hang it on the wall vertically or horizontally.


Choose at least 2 different colors for your banner. You can use as many as you like though. 
 We used 4 different pieces of cardstock....light green, dark green, gold, and one with
 a design. Be sure to select colors that compliment one another. A good Irish red 
would have been fun to add into my banner. 

After cutting out your shamrocks,  put them in pairs. Then place your shamrock pairs
 in the order that you want them to appear in the banner. Then you can start sewing. 


We are offering the SHAMROCKS to make this banner in our 
Etsy shop...... Just in case you don't want to cut them out 
yourself ......  Click HERE


Use a scrap piece of cardstock to sew lines until you get the stitch to look the way
 you want....not too tight, not too loose. I have a Bernina sewing machine and the
 straight stitch length is set on 2.  The zigzag stitch length is set at 0. Now stitch down
 through the middle of each shamrock and through the stem. I always let the machine
 run for 5 to 8 stitches in-between each piece. This will provide a little space between
 the shamrock.  Be sure to use a thread color that matches your 
main colors.  We used green here. 


Here is the beginning of our banner, three shamrocks down 15 more to go.


The length of this stitch is good. As I said before, not too tight, not too loose. 
Our shamrocks measured 2.5" wide and 3" tall.


You could also make your banner one dimensional  by sewing just one
 shamrock at a time instead of putting 2 shamrocks together.
  It would basically look like this photo. 


OTHER FUN THINGS YOU CAN DO WITH THE SHAMROCKS:
Scatter the shamrocks down the center of your buffet or dining table
Put the shamrocks on a skewer or a lollipop stick and top your cupcakes
Use them as a food pick for breads, desserts etc
Put them on the front of a treat bag
Hang the banner vertically instead of horizontally
Pin the shamrocks on the kids so they don't get pinched on St. Patrick's Day
Include them on your St. Patrick's Day wreath
Write notes to the kids on them and put in their lunchbox


Now all that's left to do is fold each shamrock in towards itself. 
 The stitching line makes it easy to bend.  Now just hang your wall quote
 on the wall, the fireplace mantel or around your other decorations. 
This one can also be hung horizontally as we faced the shamrocks going
 all the same way. Have fun making one for yourself! 


We have some really cute St Patrick's Day printables and Candy Card kits that 
would be perfect for your St. Patrick's Day celebration in our Etsy shop.
  Click HERE to see everything in our Etsy shop  INCLUDING a kit for
 all the cut out shamrocks you would need for this banner. 


*FOLLOW US* 
ETSY    INSTAGRAM  BLOG  PINTEREST  FACEBOOK


Enter your email address:


Delivered by FeedBurner

Saturday, October 12, 2019

(Tutorial) Thanksgiving Paper Pumpkin and 12 Tags......So Many Possibilities!


 (We're back with this fun pumpkin tutorial and the Thanksgiving tags!)
Now here's a pumpkin that will last and last. These paper pumpkins are
 great for a centerpiece for fall, Halloween and Thanksgiving. 
(just choose the appropriate cardstock for each holiday)
 We made them for our Thanksgiving table for the decorations 
down the middle of the table but it would also be nice to make a 
different one for each guest and place them at the top of their plates.


Click HERE to get the 12 Thanksgiving tags 
See photo of all tags below


TUTORIAL:
We used double-sided scrapbook paper so a color/design shows through 
on the inside.  We cut 12 strips   7" tall x 1" wide.  Punch a small hole in
 each end.  We inked the edges of the strips but this is an optional step. 
We bought both scrapbook papers at Archivers  The acorn print paper
 can be found HERE and the orange print can be found HERE  
Buy it online or ask for it at your local craft/scrapbook paper store.


Choose two brads that match your scrapbook paper. Put one in each end. 
Then bend the strips in the middle (so it looks like a capital C) 
Then start making the circle by pulling out each strip.


This is what the pumpkin will look like when you've got
 all the strips pulled into a circle.


We used the EK Success leaf punch for this project.
 (Find it HERE and HERE) The leaf measures 2 1/4" top to bottom
 and side to side. If you want your leaves to be two different 
colors just cut out two leaves, (2 colors) Cut one of the leaves
 in half  and glue on a a whole leaf. Then score or fold the leaf
 down the middle and on the sides. We inked the leaves
 in a chestnut brown ink.


If you don't have a leaf punch you could either draw 
and cut out your own or use silk leaves. Real leaves is a good option too.


You could use all one color for your leaves or multiple colors. 
Choose colors that match the pumpkin paper. They don't necessarily
 have to be green. We used the brad as an anchor for the stem, leaves and tendrils.


Cut out the stem 6" x 1/2" and curl as shown above.  
Cut tendrils 1/8" to 1/2"  x 6" (depending on what you like) a
nd wrap around a pencil to curl it.  The pumpkin measures 
16" around and 4" tall, without the stem and 6" tall, with the stem. 
You can make these pumpkins larger if you like, just cut the strips a little longer.


There are 12 different "Give Thanks" Tags for you to choose from.
 Just back each tag with a 2" scallop or round punched paper. 
Ink before putting it together. We used foam tabs to attach
 the tag pieces to each other. 


We've made up 12 Thanksgiving tags and want to share with everyone.  
We cut the white tag using a 1 1/2" scallop circle. The back piece is cut 
out of a 2" scallop circle. You can use round punches too. Add your
 favorite kind of embellishments and make them even more unique!

Click HERE to get the 12 Thanksgiving Tags
(print out as many as you need) 


Here is our second sample. We used a piece of scrapbook paper 
that was double sided and flipped every other strip to get this look.  
You may want to bend the leaves a little so they hug the pumpkin.


*FOLLOW US* 
ETSY    INSTAGRAM  BLOG  PINTEREST  FACEBOOK


Enter your email address:


Delivered by FeedBurner

Wednesday, September 7, 2016

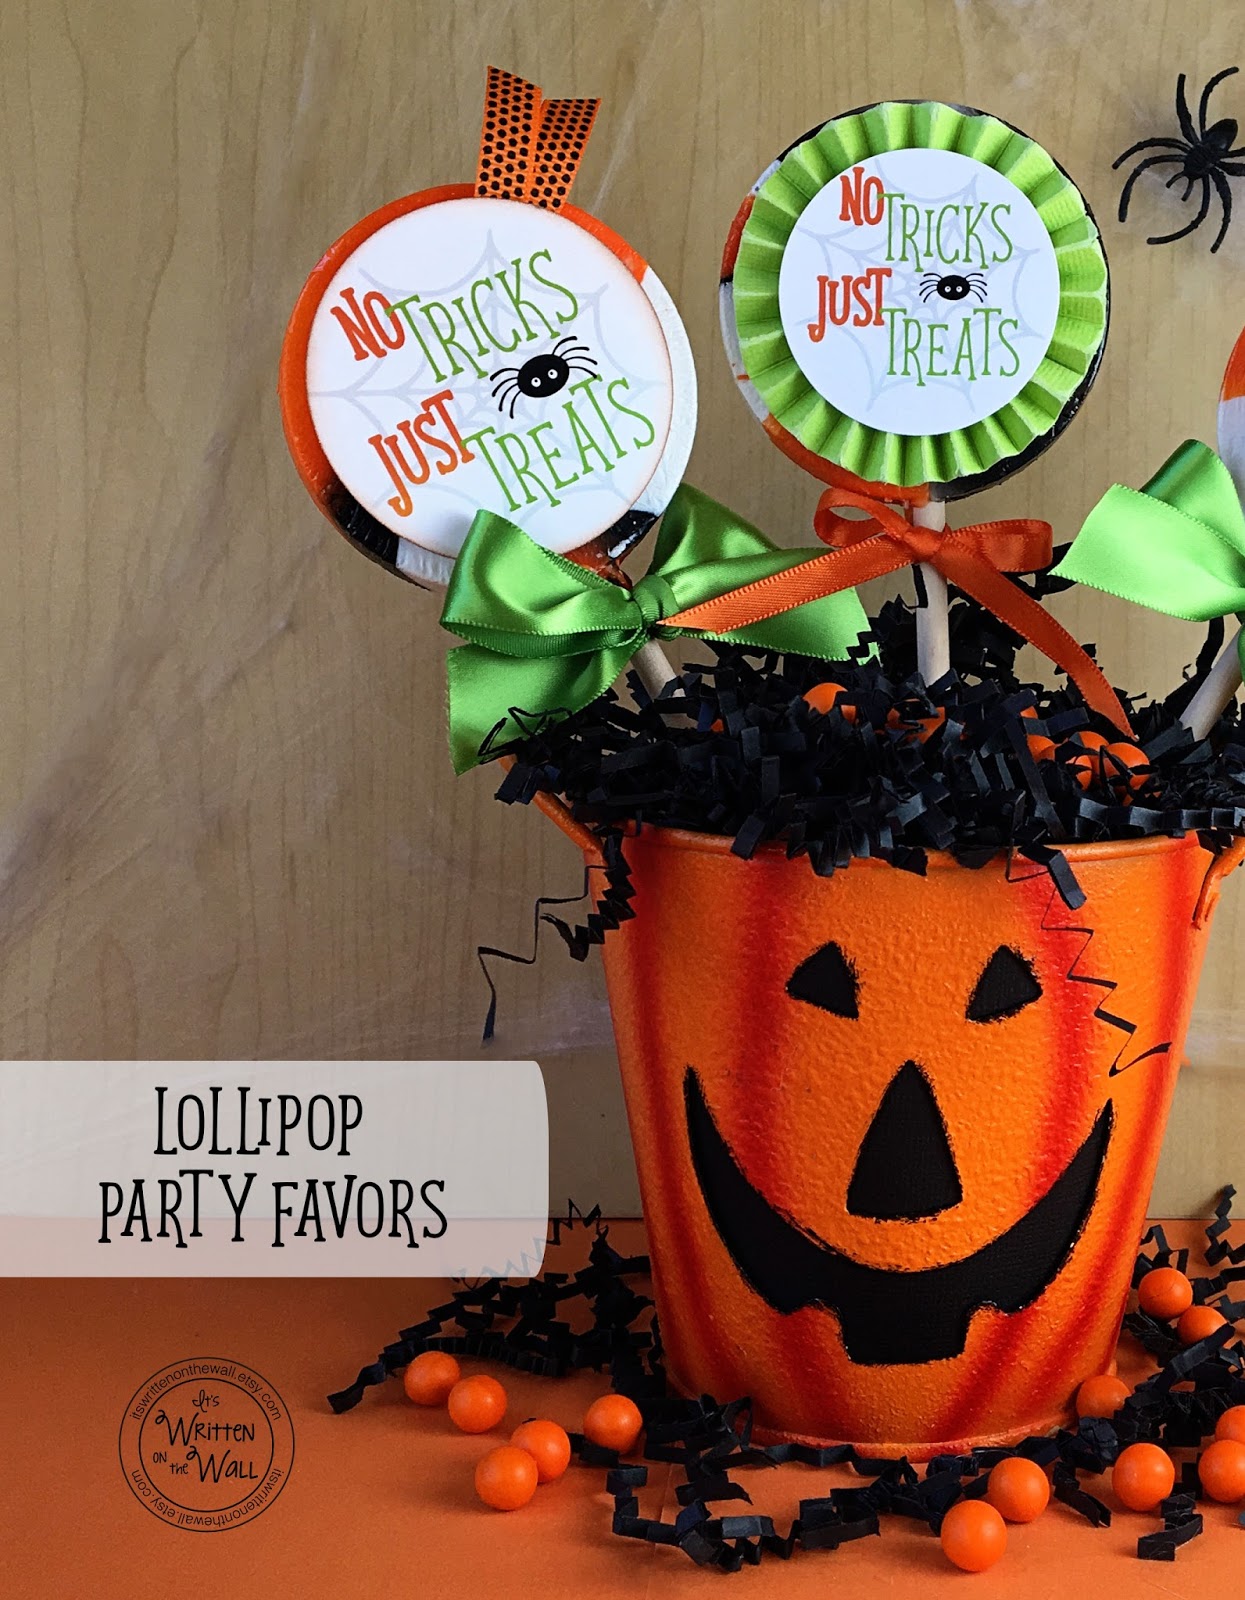
More Halloween Gift Ideas For Our "No Tricks, Just Treats" Tags-Plus The Peppermint Place Suckers and More


We wanted to show you a second idea for using our  "No Tricks, Just Treats" tags---Just add them to the front of a sucker--how easy is that?  The tags come in a 2" size and a 2.5" size. Wouldn't they be a great party favor,  plus it doubles as a centerpiece.  

We bought these lollipops at The Peppermint Place in American Fork, Utah. They have all kinds of suckers and stick candies and candy canes plus more.  HERE's a YouTube Video that gives you a tour of the shop and takes you into the back where the candy is made. (their web site is www.kencraftcandy.com  not The Peppermint Place) 


The tutorial for making these rosettes can be FOUND HERE.  They are very easy to make. Once you make one you will be on your way.  Some people call them medallions too. It's a easy way to dress up the party favor.  


We removed the clear bags that were around our suckers but you will want to leave them on if you are using them as a party treat.


We placed a piece of styrofoam inside this cute pumpkin tin and just put pushed the suckers down into it. You can buy the green styrofoam or a green floral foam brick at The Dollar Store.  Then just add some crinkle paper in the color of your choice. You can also get crinkle paper at The Dollar Store. 


Love how large these suckers are. Give one to a child and watch his eyes POP out of his head!  


Here are just a few of the Halloween suckers that we purchased last year at The Peppermint Place. (I took them out of the clear bags to get a better photo, but they do come wrapped up)  You should be able to pick up some of these same suckers and maybe some new designs this year. The Peppermint Place has been making candy in Utah since 1969.  It's just a fun place to go-The kids will LOVE it!   The Peppermint Place


HERE's the LINK for a Easy TUTORIAL for the paper Rosettes and more fun ways to use the tags for Halloween gifts.  Don't Miss it! 


*FOLLOW US* 
ETSY    INSTAGRAM  BLOG  PINTEREST  FACEBOOK


Enter your email address:


Delivered by FeedBurner

SaveSave

Thursday, August 4, 2016

Gotta See! "You've Been Booed" Printables and Treat Ideas for this Halloween plus Tutorials


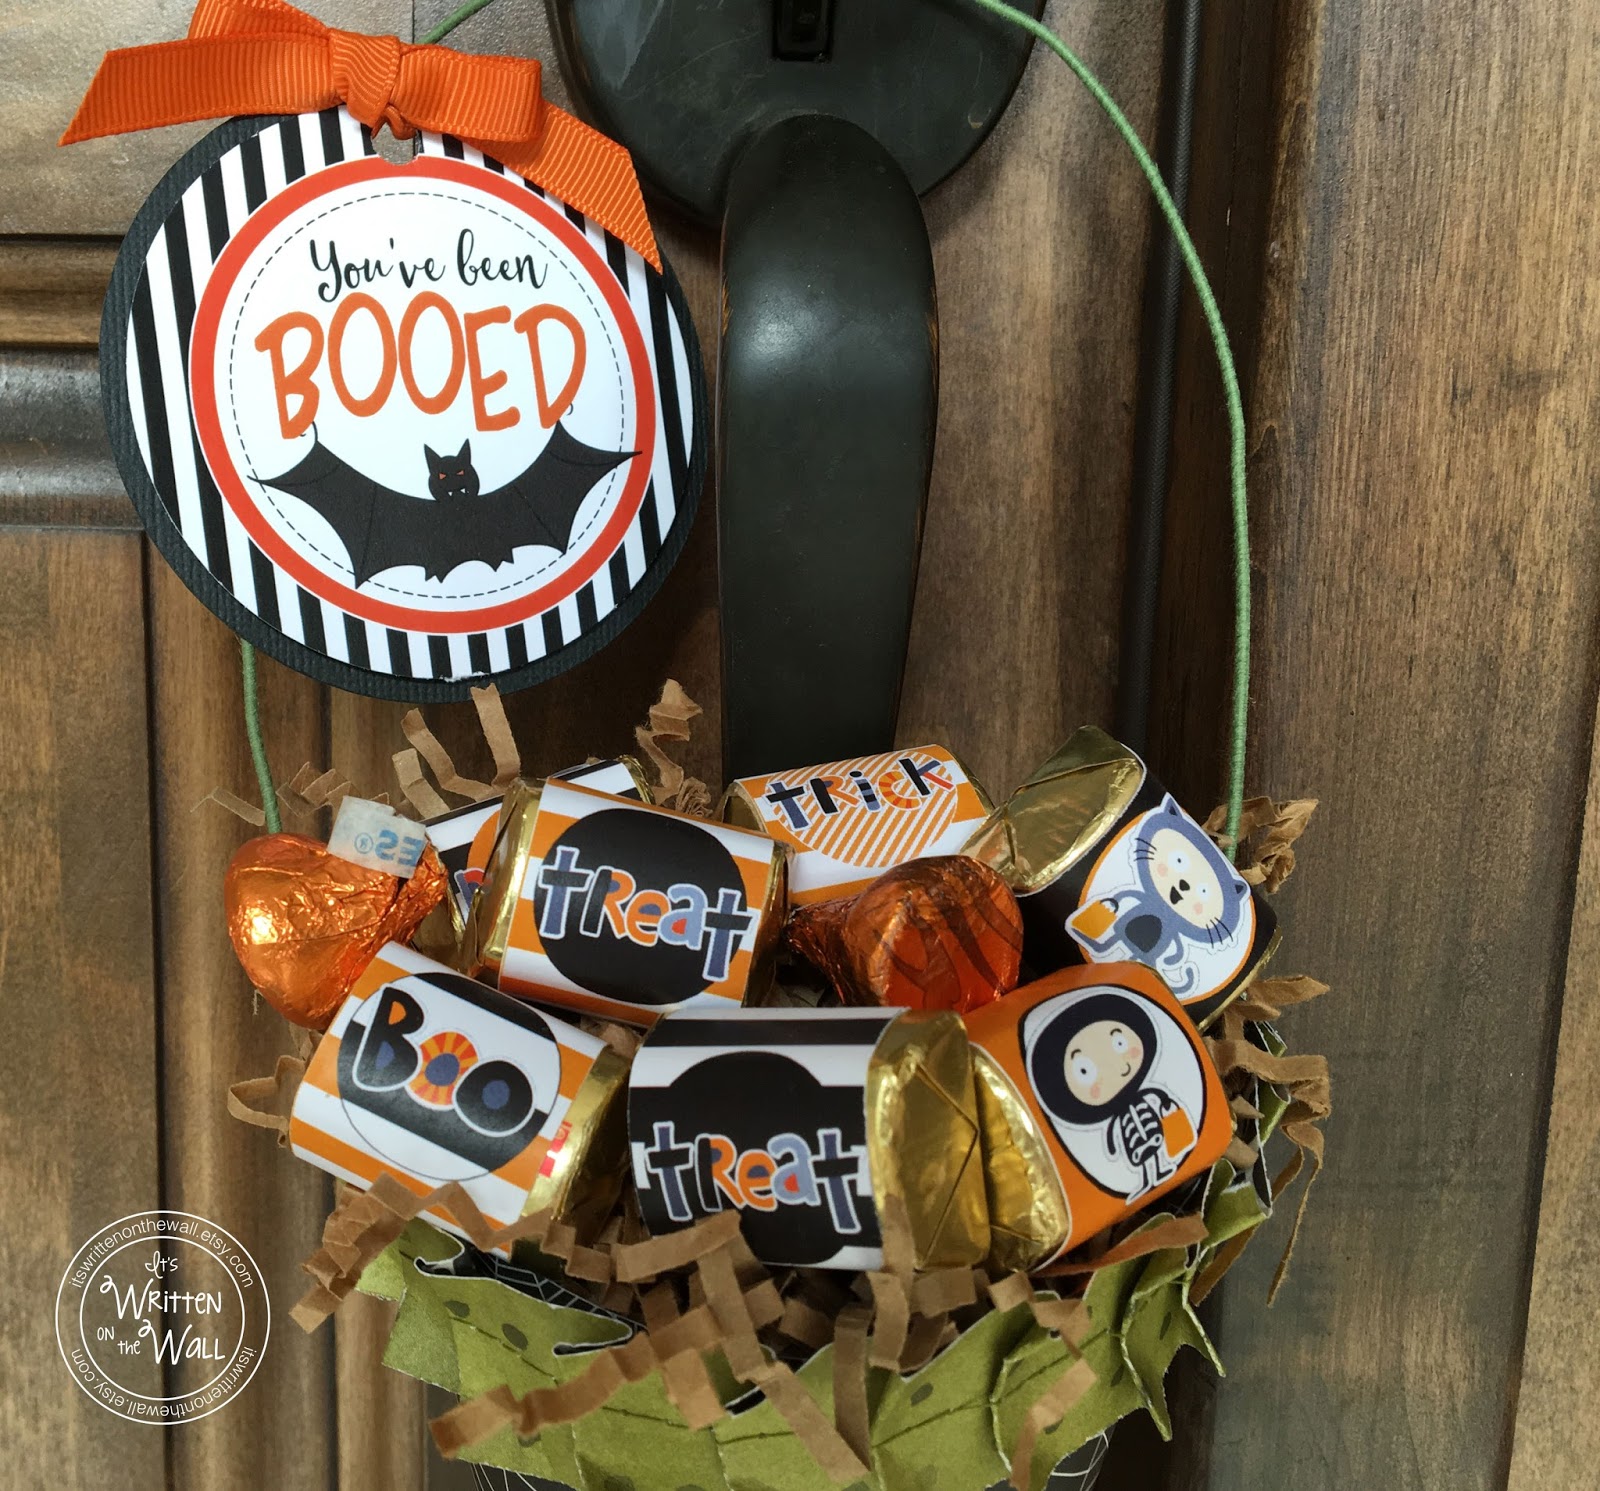
Do you "Boo" your neighbors and friends with treats every Halloween? This cute Halloween treat cone is so much fun to do and very easy. All you need is scrapbook paper, wire and glue and our tags. 
  
Just pick your favorite cardstock for the cone and a matching paper for the ruffle an you've got something fun to give out this year.  Our "You've been booed" tags will make it even cuter. 


Be sure to place both of these printables inside the cone. Just roll them up and tie with ribbon and slip inside next to the treats.  One prints tells them that they have been "Booed" and the other is for them to put on their door or front window to let others that they have already been "Booed"  You can either fill the entire cone with treats or just the top part.


Don't forget to put the "You've been booed" printable sheets inside the cone when you leave it for your neighbors. 


We've designed 8 different tags to put on the treat cone.  Which one is your favorite? Can't choose? Just use one for each treat you make up.  We backed them with a black circle measuring 3.25"  but that is totally optional too.


You can either fold the paper to make a ruffle or you can fold AND stitch it as we have done above.  Then just adhere the ruffle to the cone and add the tag.  We inked the ruffle to distress it. (optional)   


This is a smaller version. We cut a 8" x 8" piece of Halloween cardstock to make the cone. Then we cut three pieces for the ruffle.  Just glue all three pieces together so you have one piece.  We folded and stitched this one too.  Fill the cone with crinkle paper and your treats sit atop it.


Be sure to use a sturdy piece of wire for the handle so it won't bend when you put it on the door knob of your neighbors and friends.  Our Halloween Hershey Nugget wraps are available HERE.


I like the looks of a stitched ruffle over one that is just folded but both options work.  


You can fill the entire cone with treats or just on the top as shown. We added the "You've been booed" tag on the handle of this one instead of putting it on the front.  They are very quick to make and make such a great gift for neighbors, friends and family....even co-workers and others.

This one shows the ruffle that is only folded. It looks nice too. We filled it with Hershey Kisses with our Halloween Pumpkin tags.  They are available HERE


Our Square Pumpkin Halloween Kiss Tags are available HERE


*FOLLOW US* 
ETSY    INSTAGRAM  BLOG  PINTEREST  FACEBOOK


Enter your email address:


Delivered by FeedBurner

Wednesday, March 23, 2016

What a Fun Way to Package Graduation Gifts! Good for Cash, Treats, Gift Cards Etc-Unique Package!


If you are looking for a unique gift for a graduate (and are at all crafty) then this is definitely the unique gift you've been looking for.  You can personalize it to individual grads by using their school colors in the crinkle paper, the label backing paper or the item you put inside the bottle. Our school colors are Blue and Orange so we choose orange bubblegum for the inside. The sky is the limit on how you can design your package. You could even use a printed paper behind the label. 


THE DATE ON THE LABEL WILL REFLECT THE CORRECT YEAR


GRADUATION CAP TUTORIAL
1) cut a piece of cardstock 2.5" x 2.5" (rounding corners is optional) 
2) cut a piece of cardstock 5.5" long and a smidgen under 1" tall
3) keep cap on the soda bottle and glue the 5.5" piece onto the side of cap with seam on back.  
4) thread tassel ends through the hole in the 2.5 square piece and tape to back side
5) insert brad (paper fastener)  into the small hole and open up the prongs to secure it
6) Then glue the the top cap piece to the top of the soda lid and you're done. 


in case you can't find one or just want to make your own--Super Simple! 


If you're giving CASH to the graduate this is such a fun way to do it.  Although they can see that it is indeed cash they won't know how much until they actually get into the bottle.

We put $20 in this bottle. They were all $1.  If you want to put a lot of bills in the bottle you could omit the crinkle paper in the bottom. Old bills are easier to crunch and roll up when putting them into the bottle. New cash is too stiff,


3 different sized gift tags are included in this printable.  They measure 3", 2" and 1.5". You could use these tags on gifts other than this one too. 


Here are the labels that are included in this printable.


Above are the supplies needed.  Yes those are Halloween brads.....but there were some good orange  brads in the package I wanted to use.  I suggest using extra sticky double-sided tape so your label doesn't pop off the bottle.  The tassel shown is one that I made myself, super simple. Link to tutorial is above.  


TUTORIAL FOR SHASTA SODA BOTTLE


We used a Shasta 2.5 liter soda bottle this time. I like the shape of this bottle better than a 2 liter bottle plus we added a graduation cap on the lid.  The large lid opening measures 1 ¼" wide. In the past we've used a liter soda bottle and cut a "U" shape opening in the middle of the bottle. Our new way of doing it make filling the bottle so much easier.  

We put 2 rubber bands on the bottle for a cutting guide, leaving a space of 2" in-between the band. With a exacto knife we put a slice in the bottle so we could use scissors to cut out the piece.  Fill the bottom piece with crinkle paper (You can get bags of crinkle paper at The Dollar Store in lots of colors)   Then you tape the two pieces of bottle together. It doesn't have to be pretty since it will be covered up by the label.  The upper and lower pieces of bottle don't nest inside each other. 

If you are putting money in the bottle you need to fill up the top piece with money before gluing the two pieces together.  If you're putting in candy then just tape it up and put the candy down the bottle opening.  Be sure your candy will fit before totally assembling the bottle.   

Glue the graduation label onto a 4.5" x 12" piece of cardstock. Cut a second piece 4.5" tall and 5.5" long. This is the piece that you will glue onto the label piece to cover the opening in the back.  Glue the graduation label onto the bottle first. Then glue the second piece making sure the ends of this piece goes over the top and covers the ends of the white graduation label. 


This is the back view to show you how the second piece is to be attached. You could leave it off but I would suggest doing so.


CLICK HERE to get our Congrats Grad labels for your Graduation Gifts 

*FOLLOW US* 
ETSY    INSTAGRAM  BLOG  PINTEREST  FACEBOOK


Enter your email address:


Delivered by FeedBurner