If you are looking for a unique gift for a graduate (and are at all crafty) then this is definitely the unique gift you've been looking for. You can personalize it to individual grads by using their school colors in the crinkle paper, the label backing paper or the item you put inside the bottle. Our school colors are Blue and Orange so we choose orange bubblegum for the inside. The sky is the limit on how you can design your package. You could even use a printed paper behind the label.
THE DATE ON THE LABEL WILL REFLECT THE CORRECT YEAR
GRADUATION CAP TUTORIAL
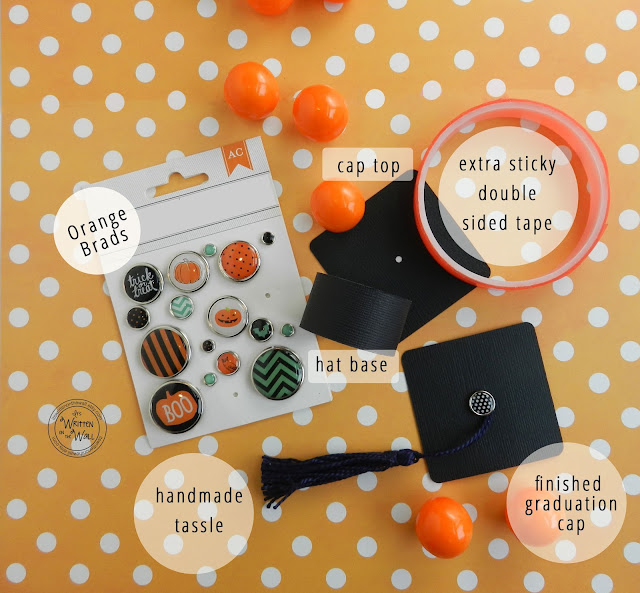
1) cut a piece of cardstock 2.5" x 2.5" (rounding corners is optional)
2) cut a piece of cardstock 5.5" long and a smidgen under 1" tall
3) keep cap on the soda bottle and glue the 5.5" piece onto the side of cap with seam on back.
4) thread tassel ends through the hole in the 2.5 square piece and tape to back side
5) insert brad (paper fastener) into the small hole and open up the prongs to secure it
6) Then glue the the top cap piece to the top of the soda lid and you're done.
in case you can't find one or just want to make your own--Super Simple!
If you're giving CASH to the graduate this is such a fun way to do it. Although they can see that it is indeed cash they won't know how much until they actually get into the bottle.
We put $20 in this bottle. They were all $1. If you want to put a lot of bills in the bottle you could omit the crinkle paper in the bottom. Old bills are easier to crunch and roll up when putting them into the bottle. New cash is too stiff,
3 different sized gift tags are included in this printable. They measure 3", 2" and 1.5". You could use these tags on gifts other than this one too.
Here are the labels that are included in this printable.
Above are the supplies needed. Yes those are Halloween brads.....but there were some good orange brads in the package I wanted to use. I suggest using extra sticky double-sided tape so your label doesn't pop off the bottle. The tassel shown is one that I made myself, super simple. Link to tutorial is above.
TUTORIAL FOR SHASTA SODA BOTTLE
We used a Shasta 2.5 liter soda bottle this time. I like the shape of this bottle better than a 2 liter bottle plus we added a graduation cap on the lid. The large lid opening measures 1 ¼" wide. In the past we've used a liter soda bottle and cut a "U" shape opening in the middle of the bottle. Our new way of doing it make filling the bottle so much easier.
We put 2 rubber bands on the bottle for a cutting guide, leaving a space of 2" in-between the band. With a exacto knife we put a slice in the bottle so we could use scissors to cut out the piece. Fill the bottom piece with crinkle paper (You can get bags of crinkle paper at The Dollar Store in lots of colors) Then you tape the two pieces of bottle together. It doesn't have to be pretty since it will be covered up by the label. The upper and lower pieces of bottle don't nest inside each other.
If you are putting money in the bottle you need to fill up the top piece with money before gluing the two pieces together. If you're putting in candy then just tape it up and put the candy down the bottle opening. Be sure your candy will fit before totally assembling the bottle.
Glue the graduation label onto a 4.5" x 12" piece of cardstock. Cut a second piece 4.5" tall and 5.5" long. This is the piece that you will glue onto the label piece to cover the opening in the back. Glue the graduation label onto the bottle first. Then glue the second piece making sure the ends of this piece goes over the top and covers the ends of the white graduation label.
This is the back view to show you how the second piece is to be attached. You could leave it off but I would suggest doing so.
CLICK HERE to get our Congrats Grad labels for your Graduation Gifts


0 comments:
Post a Comment