We've designed some Father's Day gift tags that you can put on your gift for dad. There are a lot to choose from, whether you want a round tag or a folding tag. There are all kinds of dads on these cards.....Dentists, fishermen, chefs, businessman, policeman, fireman and much more.
This gift box that is super easy to make. Use your favorite scrapbook paper and add our tags. We're using them as place cards for our Halloween dinner table, so I decided to show you all the ones we made. You can use these as gifts for family, friends and teacher. The sky is the limit when it comes to paper and embellishments
Click Here to go to our Etsy shop for these Halloween tags
We made tags for both long and short names. Just hand write the names of your guests on each tag
Here's a tag for the teacher. It's an inexpensive gift that will mean a lot. There are four different tags for a teacher gift. This box is made using two solid pieces of scrapbook paper. We embellished it with a "spooky" button.
Here's a blank place card. This is the size for a smaller name. We glued googly eyes onto this box and used a 1/4" ribbon.
You could also use the "Happy Halloween" tag at the top of the package instead on a lollipop stick.
We inked the "drippy goo" edge but that is an optional step.
Here are the tags that are available in our Etsy shop. If you want to use the treat box as a place card then just write the names of your guests on these tags. We offer a larger size for longer names and a shorter tag for shorter names. There are 6 different "Happy Halloween" tags for you to use as well. We've also included four different teacher tags so you can make a Halloween Teacher Appreciation gift. Click HERE to get a set of our Halloween Treat Tags-So many fun ways to use them.
Directions for making the boxes are shown below!
Use a 12" x 12" piece of scrapbook paper and cut it 8" x 6.5" Then score in 2" on each side.
The back of the paper is shown here. On the short side, cut score line to intersecting score line.
Then trim the the flap off as shown above.
Fold the score lines and assemble the box. I like using a glue stick instead of double-sided tape but use what you are most comfortable with. If you have a pattern on your paper,
there will be at least one side where the pattern is showing right side up.
Cut 2 pieces of paper measuring 4" x 3" (front) and then cut two pieces of paper
measuring 3" x 2.5" (sides) Score each piece at the 2" mark.
We used the Martha Stewart drippy goo edger punch since this was for Halloween but you can use anything
you like or just leave it plain. Then fold the paper at the score line.
The pieces should fit perfectly inside the box.
Before you put the pieces inside the box, put some glue (or tape) on the entire piece.
You're done! Wasn't that easy? If you use a double-sided piece of scrapbook paper you can use the front of the paper for the box and the back for the edged piece. You can mix and match papers too. Just fill a 4" x 2.5" clear cellophane bag with the treats of your choice and you're done. The finished box itself, also measures 4" x 2.5" .....not too big....not too small, just the right size.
We used lollipop sticks to put the tags on. Cut a piece of scrapbook paper just a little wider then your lollipop stick. We used a strip 1/8" wide x 4" long strip and glued it to the stick. Then for a different look, we cut the paper 1/2" wide x 4 tall " glued and rolled it around the stick. (The white color of the stick just wasn't making it for us)
The cello bag we used measures 4" x 2.5" and fit perfectly into the box. You can get them at most craft stores. I rolled up some paper and glued it to the bottom of the box. This will elevate your treat bag but is optional. You'll also need to glue the treat bag to, either the bottom of the box or the top of the paper so it doesn't fall out. Add as little or as much candy as you want to the bag. We bought the Funhouse Treats/candy from Costco. Add your tag and you're done! Wouldn't these be so darling on your Halloween table.
Want more ideas for Halloween crafts, treats, decorating and almost everything else? Head on back to our blog and put the word "HALLOWEEN" in the Search box (on the right side of the blog) and see what you come up with. We have tons of ideas! Click HERE
And now for a fun way to give those "special people" in your life a Halloween treat. We've designed a Halloween package that will hide the treat.......which is a Snicker's bar. If you've got some trick or treaters that are special to you then don't just give them the candy you're handing out on Halloween night. Make this easy but fun Halloween/Snickers box. You use your favorite Halloween paper to make these. You'll recognize the bat that we used to wrap our Halloween book marks and also the bat garland. It's one that you can use for so many things, well worth the money.
We used double sided scrapbook paper for this project. One side will be the box and the other side will be the tall back piece. We used black grosgrain ribbon measuring 3/4" It looks nice and holds the candy bar inside the box. Make a Happy Halloween tag that has blank space on the left side so you can hide the end under the moon. Be sure to use foam tabs to attach the moon, bat and tag. We used the EK Success bat punch. Click HERE to go to their web site.
We've added the "Thanks for coming" tag with a black backing on the front of this one so you can use it as a party favor. One side of this paper is Halloween sheet music and the other side is a black and orange.
We've added a medallion to this one and a cute Halloween button. You'll need a scoring board to make the medallion or you could fold it yourself. We didn't add a ribbon here because we wanted the pumpkin faces to show. Just put a glue dot on the ends of the candy bar to keep it inside the box. We used a larger "Happy Halloween" tag for this package.
Use double sided scrapbook paper for this project. It just makes it so cute with two different designs/papers showing. But you could use a solid piece of scrapbook paper if you like.
I love this pumpkin paper. We found it at JoAnn's. We cut out and glued the pumpkin paper to the back of this box. That's something you can do if you don't like one side of a paper you're using. We used a "Happy Halloween" tag that is clipped in at both ends for this one and added the "thanks for coming" tag without a paper behind it. We used 3/4" grosgrain ribbon here.
Cut your favorite Halloween paper 4 1/2" x 7 1/4" and score at the 3/4", 2", 2 3/4" and 4" marks on the scoring board.
Fold the scored lines to create the box as shown above. For this design you will now glue the box together.
We used a 2 1/4" circle punch for the moon. You could use a 2 1/2" circle too. Cut out a "Happy Halloween" tag that has a blank space on the left and finally a black bat is punched out.
You know I like to ink and that's what we've done here on the moon and the tag. We also scored some lines in the bat so it would have some dimension but you can leave it flat.
I love using the foam tabs. It looks so much better than just gluing directly to the paper. If you want more dimension you could stack two foam tabs on top of each other. Foam tabs are a must!
We're almost done now. You can fit a regular Snickers bar or an almond Snickers bar into the box. A package of M&M's fit but it did stick out on the ends a bit.
Slide the snickers bar inside the box. It will fit perfectly.
We used 3/4" black grosgrain ribbon here. Just tie a knot instead of a bow. Now you're done. Wasn't that easy. This also makes a fun Halloween gift for teacher and it is inexpensive but special.
Do you have our "You've been Booed" printable? We include the "You've been Booed" sign for the window, a instruction sheet and some free "You've been Booed" tags plus a fun way to wrap up the treats. Click HEREto go to that post.
We'd love for you to tell your family and friends about our blog www.itswrittenonthewall.com Are you following our blog yet?
We've got another fun Halloween themed gift for teacher. I'm sure you've seen the pencils that are made out of a roll of Rolo candy. Well, how about making a Halloween pencil instead of a regular yellow pencil? That sounds like fun. A yummy treat in a cute package. Perfect for teacher! We've designed these tags for you to put on the Rolo Pencils
These candy pencils are pretty easy to make and the sky's the limit on how you design them. The paper only measures 4 1/4" x 3 1/4" and can be made out of a scrap of paper. The top, or the eraser on the top of the pencil is just a pink strip of pink scrapbook. If you don't have a Cricut or Silhouette to cut out the circle for the top of the eraser, just trace the top of the Rolo roll for the circle. All this info is in the YouTube tutorial video. Click HERE to see it.
Besides the Rolo candy, which we found at 79 cents, you may already have the rest of the supplies shown above. Hershey candy kisses are $3.28 at Walmart. Shopko puts them on sale regularly for only 2.99. They will most definitely go on sale between now and Halloween.
You can use scrapbook paper that is one color or has a design, either one looks great. I like to ink my designs. I think it gives the edges definition but this project can certainly be done without inking. I used brown ink for this project. I just purchased the Martha Stewart foam pouncers and I love using them when inking.
This tool makes it so easy to ink your projects. Five different sizes are included. The price is $5.99 but use a coupon and get it for less. (I bought mine at JoAnn's)
The Rolo pencils fit nicely inside the pretzel bags. We bought ours at Walmart, 20 bags for $1.76. Add a bow and our tag and you're done.
In the photo you will see a tag cut out in the 1 1/2" scallop paper punch and the 2" scallop paper punch.
This tag can be made cut out in two different sizes. You can also use either a circle or a scallop paper punch. I really like the EK Success punches. We've included 9 different colors of tags for you to use.
Now, you'll want to know how to put together this sweet gift for teacher! We found a video tutorial on YouTube, the instructions were very good. Click HERE to see the video tutorial. But if you prefer a photo tutorial click HERE
Apples and teachers....They go together famously. And what's a better idea than a sweet apple treat for teacher for a "first of the year" thank you? We've found some yummy recipes with apples as the main ingredient. Take a look and see if there's one you'd like to make for your children's teacher or for your family. We would love for you to share this post with your friends.....Feel free to pin this on your Pinterest Page. Click HEREto go to our Pinterest Page(we've got over 72,000 followers)
Oh My! This candy apple pie looks fabulous. Looks like this one is a must for this APPLE season. Where's the recipe from? MiMi Hodge, winner of Good Morning America's "Pie of Emeril's Eye" contest 2000 Get the recipe over atThekitchn
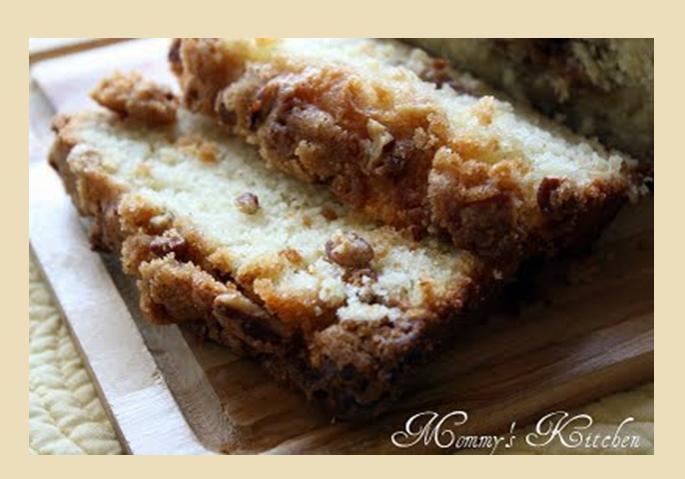
Apple Pie bread sounds amazing! Wrap it up in a clear bag, add a ribbon and a note and you've got a yummy treat. Get the recipe over at Mommy's Kitchen
How about Apple Pie jam? Sounds delicious and is a gift that can be enjoyed for a long time. Get the recipe over at Mommy's Kitchen
Ultimate Caramel Apples --Nothing's better than a caramel, white chocolate and oreo apple. But take a look at the other toppings...Yum! Recipe at Cooking ClassyClickHEREto go to our earlier post about makingThe Perfect Caramel AppleThere's some really amazing techniques you'll want to see.
Caramel Cheesecake Apple Dip (3 Ingredient 3 Minute Recipe) Fill a jar with the dip and add beautiful apples for a gift for teacher. Get the Recipe at Cooking Classy
Apple Pie Bars-Makes 12 generous bars or 24 mini bars. Looks yummy. Get the recipe at Cooking Classy
An Apple Bundt Cake would be super easy to make and so delicious. Get the recipe over atA Farmgirl's Bable
Apple Hand Pies are delicious too. Easy to package to take to teacher (or make for the family) Get the recipe over at A Cozy Kitchen
(Recipe for your kids or even Halloween party) Use your cookie cutters when slicing apples to go along with this Caramel Apple Dip. Include both the cut out shape and the whole apple. (no waste here) Love all the ingredients. Get the recipe over at Taste of Home
Apple Pie Filling is such a great idea for a gift. The recipient will certainly know it came from the heart. It will feel like fall all year when you can open one of these jars and make a Apple Pie or other apple dessert. Find the recipe and tutorial over at Skip to my Lou
Caramel Apple Cheesecake Bar -Could it be as good as it looks. Get the recipe at Picky Palate
How about some apple chips for the teacher? They sprinkle some cinnamon and sugar on top before baking them but you could leave those 2 ingredients off if you like. Get the recipe over at Vittles and Bits
I've never tried this dish (Apple Nachos) but it looks good. Apples, coconut and nuts are just a few of the ingredients in this apple dish. Wouldn't this be a yummy after school snack? Get the recipe over at Manifest Vegan
Inside out Caramel Apples? (A real kids pleaser) They're different but easy to make and just the right sized snack. Get the recipe over at Domestic Fits
So that's how they make the apples look so pretty--Use a decorator bag full of chocolate. To get the recipe and more tips on making yummy looking Caramel Apples head on over to Our Best Bites
These Williams Sonoma mini caramel apples are double dipped in caramel, then chocolate and a spider web added in. Put on your favorite Halloween ribbon and you've got a treat for your favorite people.....or you could just buy them from Williams Sonoma
This is by far the easiest way to peel, slice and core an apple. If you're planning on eating or canning a lot of apples then this is worth the investment. Available at Williams Sonoma and other places too.
What a handy gadget this is. Unlike most apple slicers, this tool produces two sizes of uniformly sliced apples. "With a downard push, it cores an apple and cuts it into thin slices for baking and cooking or thicker wedges for eating out of hand" Available at Williams Sonoma
.....And one last kitchen gadget for the apple season. Isn't this a beautiful apple corer? "Just line up the shaft with the apple core and gently twist into the fruit, then release the core with the thumb tab" Available at Williams Sonoma
Look at some of the different varieties of apples. My favorite is the Honeycrisp apple...If you haven't tried that one yet I highly recommend it. So crisp and so sweet! To get more excellent information about apples head over to the Washington Apple Commission site. Everything you ever wanted to know about apples will be there including the chart below that tells you when the different apples are available
There's also a chart that tells you what kind of apple to use in canning, baking, freezing and for pies etc. Great Info!
An apple a day keeps the doctor away....but have you tried the Honeycrisp apples? I just discovered them a couple of years ago and I couldn't believe how absolutely delicious they were. Can't wait for them to come on this year.
Here are some healthy facts about Apples
Apples come in many varieties - Apples come in a range of interesting flavors, offering a variety not available in most other fruits and vegetables.
Apples are absolutely fat-free.
Contains no sodium - helps reduce risk of high blood pressure.
Is an excellent source of fiber - helps reduce cholesterol and may help prevent certain types of cancer.
Has only 80 calories.
Need more fun ideas for Teacher Appreciation Gifts? We have Sooooo many available in our Etsy shop. You're sure to find one you love! CLICK HERE to go to our Etsy Shop